DIY Faucet Repair in Calgary: Essential Tools and Step-by-Step Guide
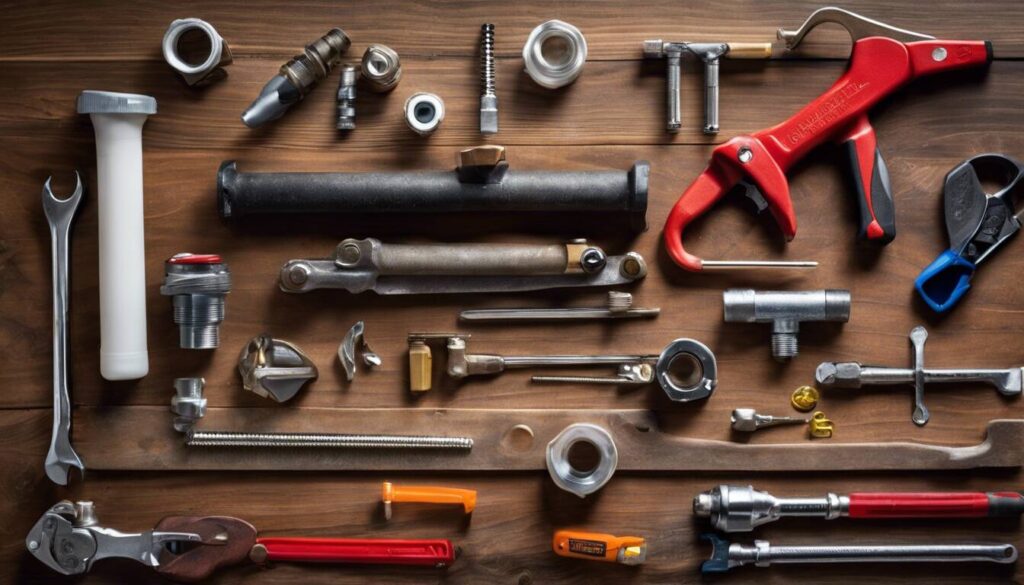
To carry out a successful DIY faucet repair in Calgary, key tools including adjustable wrenches, pliers, screwdrivers, Allen wrenches, and a pipe wrench are necessary. These common household items collectively aid in disassembling the faulty faucet, replacing damaged or worn-out parts, and resolving typical issues like leakage and incessant dripping. However, these tools won’t be of much use without concrete knowledge of how to apply them effectively. In-depth understanding of their functionality and application makes all the difference when navigating through each step of the repair. Let’s assemble your kit.
For a basic faucet repair in Calgary, you will likely need an adjustable wrench, screwdrivers, plumber’s tape, and a faucet repair kit. It’s important to have the right tools on hand before starting any DIY plumbing project.
Essential Tools for Faucet Repair
Imagine being all set to fix your leaky faucet, eager to start, but then realizing that you don’t have the right tools. Frustrating, isn’t it? Having the essential tools for faucet repair can save you time, effort, and a lot of headaches. Let’s explore the key tools needed to tackle these issues effectively.
Adjustable Wrenches: These versatile wrenches are crucial for securing and loosening nuts and bolts in faucet repair. It’s best to have two adjustable wrenches – one to hold the pipe and the other to turn the nuts.
Pliers: Pliers are your go-to tool for gripping and turning different components during faucet repair. They provide a firm grip when working on small parts like faucet aerators or fixing leaky joints.
Screwdrivers: A set of screwdrivers is indispensable for removing screws from various parts of the faucet. Phillips-head screwdrivers are common in faucet assemblies, while some may require flathead screwdrivers.
Allen Wrenches: Also known as hex keys, Allen wrenches are necessary for accessing certain parts of faucets secured with hexagonal screws. Often used when disassembling single-handle faucets, they allow access to interior components for repair or replacement.
Pipe Wrench: This heavy-duty wrench is invaluable when dealing with pipes and fittings, providing a secure grip on pipes to ease disassembly and reassembly.
Having these tools assembled will not only make your faucet repair easier but will also spare you from last-minute trips to the hardware store. When you’re well-prepared, you can work more efficiently and with greater confidence.
Equipping yourself with these essential tools lays the foundation for successful DIY faucet repair. Now that we’ve covered the tools needed, let’s move on to understanding the step-by-step process of faucet repair itself.
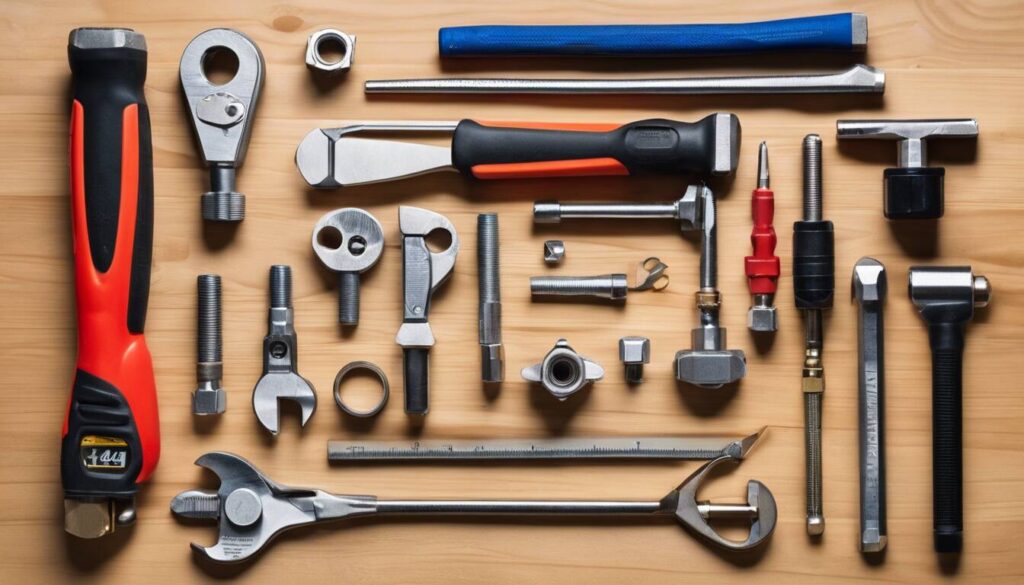
Building Your Faucet Repair Kit
Now, let’s discuss assembling your faucet repair kit. Similar to a handyman with their trusty toolbox, a DIY faucet repair enthusiast requires a reliable and comprehensive kit to effectively handle most common repairs.
Assembling Basic Tools
When it comes to assembling your basic tools, consider the importance of quality and appropriateness for the task at hand. Quality tools are not only more effective but also safer to use. Having the right size of tools is crucial too; using the wrong size can cause damage to components and make repairs more challenging than necessary.
We’re talking about wrenches here, especially those with adjustable jaws that can fit various nuts and bolts snugly. Each faucet may require different sizes of nuts or fasteners, so having an adjustable wrench can save you from making multiple trips back and forth to the hardware store.
Additionally, screwdrivers are important for removing handles and other parts when addressing leaky faucets. It’s recommended to have both flathead and Phillips-head screwdrivers in your repair kit as different faucets may have different types of screws holding them together.
Adding Specialized Tools
Apart from the basic tools essential for most repairs, there are times when specialized tools might be necessary for more intricate tasks. For instance, older or complex faucet models might require specific tools such as a faucet seat wrench, O-ring picks, or a cartridge puller.
Imagine you’re faced with a faucet that was installed many years ago. You might find yourself needing a specialized tool like a faucet seat wrench to remove corroded seats. O-ring picks become invaluable when replacing worn-out O-rings without causing damage. And a cartridge puller is a game-changer for extracting stuck cartridges without resorting to brute force that could harm other components.
So, while these specialized tools might not be needed for every repair job, having them in your arsenal can really save the day when you least expect it.
By building a well-rounded faucet repair kit with both basic and specialized tools, you’ll be prepared to tackle various issues that may arise with different types of faucets. This investment will pay off down the line as you take on DIY faucet repairs with confidence and ease.
As we’ve fortified our toolkit with essential equipment, next we venture into identifying and resolving common faucet leaks, unraveling the mysteries behind potentially wasteful water woes.
Identifying and Repairing Faucet Leaks
One of the most common problems with faucets is leaks. They can come from the spout, base, handles, or even show up as visible drips. The key to fixing any leak is to identify its source accurately. Once you know where the leak is coming from, you’ll be able to determine the right repair approach.
Identifying Common Leak Sources
When you start noticing signs of a leak, it’s essential to check various parts of the faucet.
- Start by examining the spout, where water typically flows out. A leak here usually indicates an issue with the internal components.
- Next, inspect the base of the faucet for any signs of moisture or dripping. Leaks at the base often point to problems with the O-rings or other internal seals.
- Don’t forget to check around the handles as well. Sometimes, loose handle screws or worn-out packing nuts can cause leaks from this area.
Repairing Faucet Leaks
Now that you’ve identified the specific source of the leak, it’s time to address the issue.
The most common fixes for faucet leaks involve replacing worn-out O-rings, damaged cartridges, or deteriorated washers. Understanding the type of faucet and its internal mechanism is crucial for effective repair.
Ensuring that replacement parts are compatible with your specific faucet model is vital, as using incorrect components can lead to recurring leaks or even further damage.
As you embark on repairing your leaking faucet, remember that each faucet type – whether it’s a cartridge or ceramic disk faucet – has its unique method for disassembly and maintenance. It’s always a good idea to consult your manufacturer’s manual or seek professional advice if you’re unsure about how to proceed.
For instance, if you have a cartridge faucet, you’ll need to remove and replace the cartridge inside. On the other hand, repairing a compression faucet involves disassembling the handles and changing out washers.
Furthermore, some modern faucets may feature advanced valve assemblies or intricate ceramic disks. Properly understanding these internal mechanisms is integral to executing a successful repair without causing damage.
Identifying and addressing leaks in your faucets isn’t just about stopping an annoying drip—it’s about preserving your plumbing system and preventing potential water damage in your home. With careful attention and knowledge about your specific faucet type, you’ll be equipped to tackle those leaks effectively and keep your plumbing in top-notch condition.
Safeguarding Yourself During Faucet Repair
When tackling a DIY faucet repair, your safety is just as important as fixing the faucet itself. Before lifting a wrench, take a moment to safeguard yourself against potential hazards. Even a seemingly simple repair job can pose risks, especially with older plumbing systems or corroded components.
Water Supply
To start off, always turn off the water supply before beginning any faucet repairs. This simple step is crucial for preventing accidental flooding or water damage. The last thing you want is a sudden gush of water while in the middle of a repair.
Protective Gear
With older plumbing systems come challenges, and worn-out or corroded components can present sharp edges or exposure to chemicals. Wearing protective gear like gloves and safety goggles can shield you from potential injuries during the repair process.
Materials
Gloves are particularly helpful in handling rusty parts and preventing direct contact with chemical cleaners. Safety goggles provide an additional layer of protection by shielding your eyes from any debris that may dislodge during the repair.
Just think of these safety measures as your own personal armor, ensuring that you’re well-protected as you venture into the world of DIY faucet repairs. It’s like suiting up before heading into battle – except in this case, the battle involves pipes and wrenches instead of swords and shields.
By incorporating these safety precautions into your DIY faucet repair routine, you’re not only safeguarding yourself against potential hazards but also setting yourself up for a successful and injury-free experience.
Comprehensive Faucet Repair Guide
When dealing with a dripping or malfunctioning faucet, knowing how to fix it can save you time and money. Let’s start with some common issues you might encounter when dealing with leaky faucets and then walk through a detailed step-by-step process for addressing these issues.
Common Issues with Faucets:
- Dripping: This is one of the most common issues, typically caused by a worn-out rubber washer. The persistent dripping not only wastes water but can also be incredibly irritating.
- Low Water Pressure: If your faucet barely releases any water, it could be due to a clogged aerator or inner components.
- Leaking Base: Leaks around the base of the faucet are often attributed to worn-out O-rings or a loose connection at the valve stem.
- Squealing or Screeching Noises: These sounds usually indicate a damaged or faulty faucet cartridge.
Understanding these potential problems can help you diagnose and address your faucet issues effectively. Now, let’s move on to the step-by-step guide for fixing these common faucet woes.
Step-by-Step Faucet Repair Process
1. Gather the Necessary Tools Before launching into your repair project, make sure you have all the essential tools at hand. Some must-have tools include:
- An adjustable wrench
- Screwdrivers
- Pliers
- Replacement washers
- Plumber’s tape
2. Turn Off the Water Supply Locate the shut-off valves under the sink and turn them clockwise to stop the flow of water to the faucet.
3. Disassemble the Faucet Carefully disassemble the faucet, keeping track of each part as you remove them. Lay them out in the order of their removal to simplify reassembly later on.
4. Inspect for Damaged Components Examine each component thoroughly, checking for signs of wear and tear. Look out for any damaged washers, O-rings, or cartridges that might need replacing.
5. Remove Mineral Buildup While disassembled, clean out any mineral buildup from the faucet’s interior using a vinegar solution or a commercial descaling product.
6. Replace Faulty Parts & Reassemble Replace any damaged components with new parts and carefully reassemble your faucet in reverse order.
7. Test the Faucet Turn on the water supply and test your faucet for leaks or irregularities.
For instance, if you notice water still leaking even after reassembly, you might have missed tightening a connection or replacing a faulty component.
Here’s an example diagram to illustrate how to disassemble and reassemble a typical faucet:
By following these steps, Calgarians can effectively address most common faucet issues without calling in professional help. However, it’s important to note that these instructions vary based on different types of faucets (e.g., compression, cartridge, ball-type, and ceramic disc), so always ensure that you have a good understanding of your specific faucet type before proceeding with repairs.
Armed with this comprehensive repair guide tailored specifically to Calgary’s plumbing needs, you now have the knowledge and tools required to tackle common faucet issues with confidence.
With these foundational skills in place, let’s delve into troubleshooting additional common faucet problems and their solutions.
Troubleshooting Common Faucet Problems
Picture this: it’s a regular day, and you turn on your faucet, only to find that the water pressure is way lower than it should be. Frustrating, right? Well, don’t worry – low water pressure is a common issue, and there are a few potential causes worth exploring.
Mineral Buildup: One of the most frequent culprits for low water pressure is mineral buildup. Over time, minerals in the water can accumulate in the aerator or valve, restricting the flow of water. If you notice a decrease in water pressure, try unscrewing the aerator counterclockwise using pliers (if necessary) and rinsing it thoroughly to dislodge any blockages.
Faulty Valves: Another common reason for low water pressure is faulty valves. The valves within the faucet system can wear out over time due to constant use or sediment buildup. To troubleshoot this issue, inspect the various shut-off valves in your home to ensure they are fully open.
Imagine your faucet has been dripping incessantly—driving you crazy with every drop echoing through the room. This commonly occurs due to a worn-out washer inside the faucet that fails to form a complete seal, leading to leaks and drips.
Worn-out Washers: The primary cause of a dripping faucet is often a worn-out or damaged washer. The constant compression and decompression of the washer against the valve seat can lead to wear and tear over time, resulting in leaks and persistent dripping. To remedy this issue, you’ll need to disassemble the faucet and replace the worn washer with a new one of the same size and shape.
Leaky Seals: In some cases, leaky seals can contribute to faucet drips. The seals within the faucet handle may deteriorate over time, allowing water to seep through and create annoying drips. To address this issue, carefully dismantle the faucet handle and inspect the seals for any signs of damage or wear.
By understanding these common faucet problems and their underlying causes, you’re better equipped to troubleshoot and resolve issues as they arise. Now let’s delve into comprehensive steps on how to successfully repair these common problems on your own.


