How to Repair a Moen Kitchen Faucet: Troubleshooting and Replacement Parts
Problems with your Moen kitchen faucets, like low water pressure or leaks, can be tackled successfully at home. Knowledge of these common issues is your best tool for doing repairs. Remember though, that just like puzzles, faucets can sometimes surprise us with less common issues that require specific parts and steps to fix. Don’t worry, navigating your way around these small surprises is not as hard as it sounds. Now let’s get started on identifying the issues. Repairing a Moen kitchen faucet may involve replacing the cartridge or addressing leaks. It’s essential to turn off the water supply before attempting any repairs. For complex issues or if you’re not confident in your plumbing skills, it’s best to contact a professional, such as My Calgary Plumber Ltd, for expert assistance.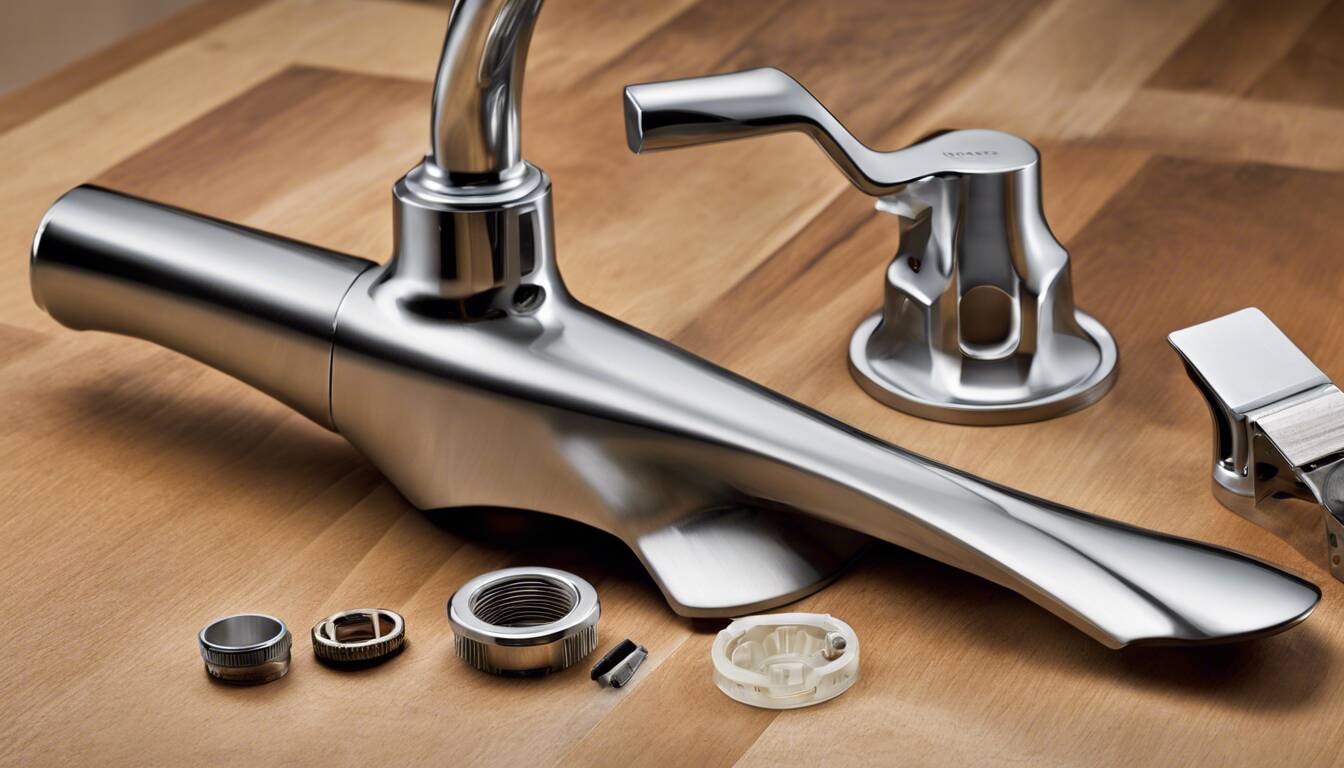
Identifying Common Problems with Moen Kitchen Faucets
Moen kitchen faucets are reliable fixtures, but over time they can encounter some common issues. One of the most frustrating problems is low water pressure. If you notice that the flow of water from your faucet seems weak or inconsistent, it could be due to mineral deposits or debris clogging the aerator—a small screen located at the end of the faucet spout. Starting with this simple check can often resolve low water pressure issues.
Another frequent problem is dripping or leaking from the faucet. A leaky faucet not only causes water wastage but also adds to your utility bill. It’s essential to identify the source of the leak, which could be a worn-out O-ring, a faulty valve, or corroded internal components. Addressing these issues promptly can prevent any further damage and water wastage.
Some Moen kitchen faucets may experience difficulty in swiveling or turning due to mineral buildup within the faucet’s mechanism, which hinders smooth movement. Regular maintenance and cleaning can help prevent and alleviate this problem.
Issues with temperature control are also common in Moen kitchen faucets. If you find it challenging to adjust the temperature of the water, it may be due to a malfunctioning cartridge or a faulty valve. Replacing these components with genuine Moen replacement parts often resolves temperature control issues effectively.
Addressing these common problems as soon as they arise ensures efficient operation and extends the lifespan of your kitchen faucet. Timely intervention can prevent more extensive damage and costly repairs down the road.
Understanding these common problems with Moen kitchen faucets and their potential causes empowers homeowners to take proactive measures to troubleshoot these issues effectively and maintain their faucets in optimal working condition for years to come.
Troubleshooting Moen Kitchen Faucet Issues
Understanding how to troubleshoot common issues with your Moen kitchen faucet ensures that you can address minor problems before they escalate into larger, more costly repairs. Here’s a breakdown of key troubleshooting steps:
Check Water Supply
The first thing to do is ensure that the water supply valves under the sink are fully open. If these valves are partially closed or restricted, it can affect water flow to the faucet, leading to reduced water pressure or irregular water flow. Even a slightly closed valve can cause noticeable changes in water pressure and flow, so ensuring that they’re fully open is vital for maintaining proper water flow.Inspect Aerator
A clogged aerator can often be the culprit behind low water pressure in your Moen kitchen faucet. The aerator is located at the end of the faucet spout and helps regulate the flow of water by mixing air with the stream. To troubleshoot this, unscrew the aerator and inspect it for any debris that may be obstructing the flow. Over time, sediment, mineral deposits, and other particles can accumulate within the aerator, causing a decrease in water pressure. Thoroughly cleaning the aerator using a brush or soaking it in vinegar can help remove any blockages and restore proper water flow.Examine Cartridge
A damaged cartridge can result in various issues such as temperature control problems or leaks within your Moen kitchen faucet. The cartridge is crucial for regulating the flow and temperature of the water. If you notice irregularities with temperature control or leaks, it’s important to inspect the cartridge for any signs of damage. Identifying and replacing a faulty cartridge can effectively resolve these problems and restore optimal functionality to your kitchen faucet. By meticulously troubleshooting each of these potential problem areas, you can proactively address common issues affecting your Moen kitchen faucet without necessarily having to seek professional assistance. This saves time and helps maintain the efficiency and longevity of your kitchen fixture. Regular maintenance and timely troubleshooting are key to ensuring smooth operation and reliability when it comes to your kitchen faucet. Mastering these troubleshooting techniques provides a solid foundation for understanding and resolving issues related to your kitchen fixtures. Now, let’s explore knowledge essential for diagnosing and mitigating another prevalent concern—kitchen faucet leaks.Understanding Kitchen Faucet Leaks In Calgary
A leaky kitchen faucet is not just an annoyance; it can lead to water wastage and potential damage to your sink area. Hence, it’s essential to figure out where the leak originates from, especially as most faucets have multiple points where leaks can occur, including the base, spout, handle, or spray hose.
To start with, a leak around the base might indicate worn-out O-rings or damaged seals. The spout might be leaking due to a corroded valve seat, while a dripping handle could be caused by a worn-out cartridge or stem. As for the spray hose, leaks here are often due to worn gaskets or cracks in the hose itself.
Pinpointing the specific area of the leak helps ensure that the proper repair or replacement actions are taken—you wouldn’t want to replace the entire faucet when all it needs is a small component swap. Even though these are common scenarios, there may be other potential causes for leaks as well. Hence, giving close attention to the various parts of your faucet is crucial in order to mend the issue effectively.
For instance, if you notice water pooling around the base of the faucet, this might signify a base leak pointing to problems with the faucet’s body and associated components. On the other hand, water dripping from the spout even when the faucet is turned off indicates a spout leak. This emphasizes the need to check any visible wear and tear on these components and be prepared to replace them if needed. Moreover, seeing water leaking under your sink cabinet when you use the sprayer could point toward hose issues, necessitating close examination for any signs of damage or deterioration.
By being aware of these indicators and symptoms of different faucet leaks, you’re equipped with essential insights that’ll guide you in determining prompt and effective solutions.
Now that we understand where kitchen faucet leaks can originate and have identified some common warning signs for each type, it will be easier to take targeted action to address any issues promptly.
Dealing with Moen Kitchen Faucet Handle Issues
Kitchen faucets endure a great deal of use. Over time, all that handling can affect their handles. It’s quite common for Moen kitchen faucet handles to become loose or wobbly. This could make it difficult to turn the water on and off or even adjust the temperature. Though it may seem minor, leaving it untended can lead to further annoyance.
But fret not! There are ways to address these handle issues without needing to call a professional. The first step is to inspect the mounting nuts located under the sink that secure the faucet in place. A loose nut can cause wobbling and difficulty in using the faucet.
For instance, if you discover that these mounting nuts are the issue, simply tighten them using a wrench. Remember, avoid over-tightening as this can lead to damage and leaks.
Moreover, wear and tear often affects the cartridge within the faucet’s handle. When this occurs, you might experience difficulty in turning the faucet on or off smoothly. Replacing a worn-out cartridge can resolve this problem and restore smooth operation to your Moen kitchen faucet.
Additionally, handle adapters may need repositioning if they have shifted over time due to repeated use. Misaligned handle adapters can result in difficulty adjusting the water temperature. Properly repositioning them will ensure that the temperature settings align accurately with your preference.
Taking care of your kitchen faucet handle issues goes beyond addressing the inconvenience they cause; it’s also about ensuring that your Moen kitchen faucet remains in excellent working condition for years to come.
Now, let’s explore a comprehensive guide to finding replacement parts for Moen kitchen faucets—a valuable resource that ensures you’re equipped to maintain the functionality of your kitchen fixture.
A Guide to Replacement Parts for Moen Kitchen Faucets
 When it comes to fixing a Moen kitchen faucet, having the right replacement parts is crucial. Let’s delve into a rundown of the key replacement parts you may need and the importance of ensuring they match your specific faucet model.
Cartridges
The cartridge is like the heart of your faucet. It assists in controlling the water flow and temperature. Over time, cartridges can wear out and cause leaks or temperature control problems. When choosing a replacement cartridge, make sure it’s compatible with your specific Moen faucet model.O-Rings
O-rings are small, circular rubber rings that help create a watertight seal in various parts of the faucet. If you’re experiencing leaks around the base of the faucet or at the handles, worn-out O-rings could be the culprit. Match the model of your Moen faucet for an effective repair.Aerators
Aerators are the small screens located at the tip of the faucet spout. They mix air with water, providing a steady stream while reducing splashing. If your faucet’s water flow seems irregular or lacking in pressure, it might be time to replace the aerator. Ensure that you select an aerator designed for your specific Moen faucet model to ensure compatibility and proper function.Handles
Handles are another critical component that may need replacement due to wear and tear over time. Whether it’s a single or double-handled faucet, replacing damaged or malfunctioning handles can restore both functionality and aesthetics to your kitchen faucet. Matching the style and size of your current handles with their replacements is essential for a seamless fit.Spout Repair Kits
Spout repair kits are comprehensive solutions for addressing leaks or other issues in the spout assembly. They typically include a wide range of components to address different spout-related problems. Ensure that the spout repair kit corresponds to your specific Moen kitchen faucet model. In essence, when it comes to repairing a Moen kitchen faucet, precision, and compatibility are key in selecting replacement parts. Each part plays a crucial role in maintaining the proper functioning of your faucet, so getting the right replacements ensures longevity and optimal performance. Heading into detailed steps to repair your Moen kitchen faucet, let’s now focus on practical strategies to diagnose issues and carry out repairs effectively.Detailed Steps to Repair Moen Kitchen Faucet
Imagine this: you turn on your kitchen faucet, and instead of a smooth stream, you’re greeted with an erratic spray that just won’t cooperate. Whether it’s a leaking faucet, reduced water flow, or any other issue, knowing how to repair your Moen kitchen faucet can save you time and money. It’s always useful to have a set of reliable tools at the ready for such occasions.
Step 1: Gather Necessary Tools
To tackle the task effectively, you’ll need an adjustable wrench, screwdriver, pliers, and a replacement cartridge or other parts needed for the repair. It’s like being prepared for battle but with tools instead of swords and shields!Step 2: Turn Off Water Supply
Once you’ve gathered your tools, locate and shut off the water supply valves under the sink to prevent any water flow during the repair process. This step is crucial to avoid unexpected water spills and flooding during the repair work.Step 3: Disassemble Faucet Components
Now comes the moment to carefully disassemble the faucet components such as the handle and spout to access the internal parts that may require repair or replacement. Imagine it as if you’re venturing into the inside of a complex puzzle. Each piece has its place and purpose. Given that each Moen faucet model may have specific disassembly instructions, it’s essential to refer to the product manual for guidance if available. If not, there are numerous online resources and tutorials available. Remember: Patience is key here. Rushing through disassembly can lead to misplaced parts or even damage.Step 4: Replace Faulty Parts
With the internal components exposed, inspect, replace, or repair the damaged components as per the identified issue. You should follow the specific instructions for your Moen faucet model and stay mindful of fragile parts throughout this process.Step 5: Reassemble and Test
Once you’ve worked your magic within your faucet, it’s time to reassemble the components carefully. Take extra care not to scratch or damage any part—precision is crucial when reassembling. After reassembly, turn the water supply back on to test for proper functionality. Armed with these detailed steps and a few trusty tools, you’re ready to restore your Moen kitchen faucet to full function. With careful disassembly, replacement of faulty parts, and meticulous reassembly, tackling repairs becomes much more manageable!Essential Tools for Moen Kitchen Faucet Repair
Imagine having everything you need before starting a big project—it makes everything so much easier. Well, faucet repair is no different! Let’s talk about the tools required to get that Moen kitchen faucet back up and running.


