DIY Plumbing Repairs for Beginners: A Step-by-Step Guide to Fix Common Issues
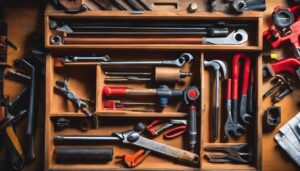
Taking on your own plumbing issues doesn’t have to be intimidating. To start, fundamental tools like a pipe wrench are typically required, a tool designed for gripping and rotating pipes and fittings. However, contrary to what one might assume, not all plumbing tools are heavy-handed; some, such as the humble plumber’s tape or the vital washer set often play an unseen yet pivotal role. Now, let’s talk about turning pipes…
Beginners can start with simple tasks like fixing a leaky faucet, unclogging a drain using a plunger, or replacing a toilet flapper. Remember to turn off the water supply before attempting any DIY plumbing repair.
Essential Tools for DIY Plumbing Repairs
When it comes to plumbing repairs, having the right tools is essential. Imagine trying to fix a leaky pipe without a pipe wrench or unclog a drain without a plunger – it would be like trying to eat soup with a fork: frustrating and ineffective! These tools not only make the job easier but also ensure that you can get the repair done correctly and efficiently.
Pipe Wrench: This is your go-to tool for gripping, holding, and turning pipes and fittings. It’s an absolute must-have for any plumber tackling repairs.
Plunger: A crucial tool for clearing clogs in sinks, toilets, or tubs. It’s the unsung hero of many a household plumbing crisis.
Pipe Cutter: When you need to cut pipes cleanly and accurately, this tool is indispensable. Precision cutting ensures a better fit when joining pipes together.
Adjustable Wrench: From loosening bolts to tightening nuts, an adjustable wrench allows you to get a good grip and apply just the right amount of force.
Plumber’s Tape: Creating leak-proof seals in threaded pipe joints is made possible with this thin white tape. It’s like a superhero cape for leaky joints!
Hacksaw: When sawing through metal or plastic piping is necessary, a hacksaw is your best friend. It’s the unsung hero behind many successful plumbing projects.
Auger or Snake: For stubborn clogs further down the line, an auger or snake can reach where other tools can’t, breaking up blockages and restoring flow.
These tools are truly the backbone of any DIY plumbing kit—imagine carrying out a plumbing repair without them; it would be like trying to bake a cake without flour!
Understanding the importance of these tools for DIY plumbing repairs sets the stage for exploring how they work in action and why having them on hand can save both time and money in the long run.
Identifying and Handling Common Leak Problems
Leaking faucets, pipes, or toilets can be a nightmare, especially when you’re just starting with DIY plumbing repairs. Don’t worry, understanding the types of leaks and how to fix them will help you gain confidence and keep small issues from turning into bigger ones.
Types of Leaks
Identify various types of leaks, such as dripping faucets, leaking pipes, or running toilets.
- Dripping Faucets: This is one of the most common types of leaks found in homes. The constant drip-drip-drip can quickly become annoying and lead to wasted water. It’s usually caused by a worn-out washer or O-ring inside the faucet.
- Leaking Pipes: These are a bit more serious and can cause water damage if not addressed promptly. Small pipe leaks can sometimes be temporarily sealed with plumber’s tape, but larger issues should be handled by a professional.
- Running Toilets: A toilet that runs continuously even when not in use is also a type of leak that can waste a significant amount of water over time. It’s often caused by a faulty flapper or fill valve.
Knowing the type of leak will help you decide on the best course of action to take.
If your faucet is dripping incessantly, diving into the faucet repair is needed. On the other hand, if you notice tiny wet spots near joints or fittings on your pipes, this might require a different approach involving tightening fittings or using plumber’s tape.
Fixing Dripping Faucets
Replace the washer or O-ring inside the faucet to stop the drip.
Fixing a dripping faucet is often as simple as replacing the worn-out washer or O-ring inside the faucet assembly.
Turn off the water supply to the affected faucet.
Unscrew the handle and remove the assembly to access the old washer.
Swap out the old washer or O-ring for a new one of the same size and type.
Reassemble everything carefully and turn the water back on to see if the drip has stopped.
Fixing a dripping faucet not only saves water but also prevents further wear and tear on the faucet components.
Leaking Pipes
Use plumber’s tape to seal small leaks temporarily and consult a professional for larger issues.
Small leaks in pipes can often be temporarily sealed using plumber’s tape while awaiting professional assistance. This temporary solution can prevent water damage until a permanent fix is applied.
If you notice a small pinhole leak in one of your pipes, carefully dry the area and apply plumber’s tape around the affected area. Be sure to monitor it closely until you can get professional help.
It’s like putting a band-aid on until you can see a doctor. It won’t fix things permanently, but it prevents further harm until proper treatment is administered.
Identifying and handling these common leak problems is an essential skill for any DIY plumber. It sets the stage for tackling more complex issues with confidence while preventing potential damage from escalating.
Adjusting and Repairing Plumbing Fixtures
Plumbing fixtures like faucets and toilets are the unsung heroes in any household. They’re used multiple times a day, every day, and sometimes need a little extra care to keep them functioning optimally. Here are some tips for adjusting and repairing these essential fixtures to nip potential problems in the bud.
Adjusting Leaky Faucets
A leaky faucet isn’t just annoying; it’s also a waste of water. Did you know that a single drop per second can add up to 3,000 gallons in a year? That’s enough water for over 180 showers! But don’t worry, fixing it is usually simpler than it seems. Loose handles are often the culprit, causing an annoying drip that can drive anyone up the wall. To set things right:
- Locate the water shut-off valve under the sink and turn it off to avoid any water mishaps during repairs.
- Disassemble the faucet handle using a screwdriver and an Allen wrench if required.
- Examine all parts carefully for any signs of wear or damage. If something looks off, replace it as needed.
- Using an adjustable wrench or groove-joint pliers, tighten any loose nuts or fittings that might be causing the leak.
- Reassemble the faucet handle and turn the water supply back on, checking for any remaining leaks.
This process is straightforward with the right tools and attention to detail. It’s like performing surgery on your faucet, but without the scary masks and beeping machines.
Repairing Toilet Issues
Toilets have their own set of quirks, often manifesting as running water noises even when no one’s using them. This is typically due to a faulty flapper or overflow tube – parts that play key roles in controlling water flow. When your toilet starts acting up:
- First, inspect the flapper at the bottom of the tank. If it’s not sealing properly after each flush, it’ll allow water to continue flowing from the tank into the bowl.
- Check the float arm and adjust the water level so that it reaches about half an inch below the overflow pipe.
- If you detect a malfunctioning flapper or fill valve after diagnosis, consider replacing them with new parts for improved functionality.
- Monitor how your toilet functions after these adjustments to ensure there are no lingering issues.
Ensuring your toilet operates smoothly will save you from larger setbacks down the line—nobody wants surprise indoor flooding!
By adjusting leaky faucets and promptly addressing toilet woes, you’re taking proactive measures to stay ahead of more severe plumbing troubles and conserving valuable resources in the process.
Correct Techniques for Shutting Off the Water
Water can cause substantial damage if it leaks or bursts uncontrollably. Therefore, knowing how to shut off water to your home or specific fixtures is a crucial skill for any homeowner. Let’s delve into the specifics of how to locate and safely shut off your main water valve as well as how to isolate water supply to individual fixtures without disrupting the entire household.
Locating the Main Water Valve
The main water valve serves as the gatekeeper regulating the flow of water into your home. In most cases, it can be found near the water meter in the basement or outside the house. It’s essential to know where this valve is located in case of emergencies such as burst pipes or major leaks. By promptly shutting off this valve, you can prevent significant water damage to your property. Make sure that everyone in your household knows where this valve is and understands how to operate it.
Shutting Off Water to Specific Fixtures
In addition to knowing where to find the main water valve, understanding how to shut off water to specific fixtures within your home can save you time and trouble. This knowledge allows you to work on individual plumbing elements without affecting the supply of water to the entire house. If you’re dealing with a leaky sink, a malfunctioning shower, or a faulty toilet, being able to isolate the problem area will enable you to make repairs efficiently.
For instance, if you have a leaking faucet, there should be shut-off valves under the sink that allow you to turn off the water specifically for that fixture. Learning about these valves and their locations empowers you to address plumbing issues without causing inconvenience to other members of your household.
Remember, preparation is key. Regularly check that these valves are in good working condition and not stuck due to lack of use. The last thing you want during an emergency is to find out that these crucial valves are unusable.
Understanding and consistently maintaining control over your water supply ensures that you are well-prepared for any potential plumbing emergencies when they arise. By learning and implementing these techniques, homeowners can take proactive measures to safeguard their property against water damage.
Cutting and Connecting Pipes: A Guide for Beginners
Ever watched someone connect pipes and thought, “That looks easy”? Well, it can be—but only if you do it right. Cutting and connecting pipes is one of the essential skills every DIY plumber should master. It’s not just about joining pipes together; it’s about ensuring a snug fit that won’t leak and cause damage. Let’s break down the process step by step, starting with cutting the pipes.
First things first, safety is paramount when working with pipes. Always wear protective gear to shield yourself from any debris or particles—whether it’s gloves to protect your hands, safety glasses to shield your eyes, or a dust mask if you’re working in a dusty area. Remember, measurements are critical so make sure to measure twice and cut once.
“Measure twice, cut once” isn’t just a saying—it’s solid advice when it comes to plumbing work.
Cutting Pipes
Before even thinking about cutting a pipe, mark it carefully with a pencil where you need to make the cut. This will help ensure that the pipe is cut straight and at the correct length. Then, using a pipe cutter, carefully make the cut following the marked line. The key here is precision—uneven cuts can lead to leaks and an improperly functioning system.
A good quality pipe cutter is worth its weight in gold when you’re working on plumbing jobs. It ensures clean cuts and makes your job much easier. Remember to use steady pressure when turning the cutter around the pipe to get a nice, clean cut.
Connecting Pipes
When it comes to connecting pipes, different materials require different techniques. For copper pipes, appropriate fittings and soldering techniques are used to create strong, leak-free connections. On the other hand, plastic pipes are typically joined using solvent welding or gluing techniques.
For instance, with copper pipes, after you’ve cut them to size and removed any burrs from the inside and outside of the pipes (which can cause turbulence in the flow of water), you’ll slide on the appropriate fittings and then solder them in place using a propane torch.
On the contrary, plastic pipes (PVC or CPVC) are generally connected using solvent welding, which involves applying a specific glue to both the pipe and fitting and then quickly pushing them together before it sets.
Remember, choosing the right fittings for your specific needs is crucial. Make sure everything fits together snugly and smoothly before committing to any solvent welding or soldering.
Your plumbing project might seem daunting at first, but understanding these fundamental techniques will help you avoid costly mistakes down the line. Always prioritize safety and precision as you develop these essential DIY skills.
Acquiring these foundational plumbing skills sets you up for success in tackling even more ambitious projects. Now, let’s move on to explore the intricacies of installing new plumbing fixtures.
Guideline for Installing New Plumbing Fixtures
So you’ve got your new plumbing fixtures ready to be installed—exciting times! The first thing to remember, and it’s a big one, is always read through the manufacturer’s instructions before beginning any installation. This guideline is like a map that ensures you don’t get lost along the way. It helps you understand how all the parts go together and what tools you might need.
Remember: Installing plumbing fixtures can be more complicated than it seems, so it’s crucial you follow these instructions carefully.
After reading the manual, make sure each part is in its right place and properly aligned before you start tightening anything. This step keeps everything functioning smoothly and prevents leaks down the line.
Sealing Threaded Joints
When it comes to connecting pipes or fittings, sealing threaded joints properly is really important. This means using plumber’s tape to create a tight seal. It might seem like a small detail, but ensuring that threaded connections are securely sealed can prevent leaks in the future. But remember, it’s essential to tighten them securely without over-tightening. Over-tightening can cause damage to the threads or fittings, leading to potential leaks which can be a real hassle down the road.
Imagine that your threaded joints weren’t sealed properly—it would be like trying to cook something without turning on the stove. You’d have all the right ingredients, but something important would be missing, and the end result wouldn’t be what you expected.
After reading and understanding the manufacturer’s instructions and ensuring proper alignment of the fixtures, applying plumber’s tape to threaded connections will help create a secure seal and prevent any potential leaks, ensuring a successful installation.